Graphics for Digital Cutters
Tutorial

Wildflower

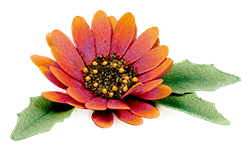
Each layer of the flower was cut from a dark yellow piece of cardstock.
I colored each individual petal on each layer with a red watercolor pencil.
Start coloring at the center and blend the color out almost to the tip of the petal with a damp brush.
The red pencil on top of the yellow cardstock should give that area of the petal a dark orange-ish appearance.
Allow the watercolor to dry.
Color each petal with a magenta watercolor pencil right over the red, blending it out about one third to one half up the red colored area.
Don't blend it out too far as the center of the flower is darker and you want the red to show.
The leaves were cut from pale green cardstock.
They were shaded with a darker green watercolor pencil.
The center of the flower was created by rubbing two Styrofoam balls together to create little bits of foam.
I put these into a small snack zip lock bag and added a few drops of dark brown India ink on top of the bits.
Close the bag and smoosh the ink and foam together to color the foam.
It doesn't matter if it is evenly colored, as that will give a variation of color to the center.
Open the bag and allow the foam to dry.
When it is thoroughly dry, glue to the center of the flower.
You may have to build it up in layers to get good coverage.
Use the eraser end of a pencil, or similar, to press down on the center creating an indentation. Also, try to keep the edges raggedy.
If desired, glue a few very small yellow glass beads around the outside edge of the center. Don't be too neat or precise.
Since doing this flower, I have found some watersoluble ink pencils that are great.
They work just like ordinary watercolor pencils, but are permanent when dry. They are Inktense by Derwent.